Quantcast
Channel: Hacker's ramblings - Hardware
Viewing all 142 articles
Browse latest View live

Supermicro IPMI BIOS upgrade fail [Solved!]

$
0
0

I tried to upgrade my Supermicro SuperServer 5015A-EHF-D525 IPMI BIOS to have the Heartbleed fixed in it. It failed on me. :-( Badly.

It looks like Supermicro's Linux upgrade too is the culprit. It enters BMC upgrade mode, starts pushing bits to FlashROM, and then segfaults. I tried couple of BIOS-versions, but to make things worse, I was going from version 2.x to 3.x and there was no downgrade possibility anymore. The BMC was semi-concious, but it really couldn't do much. For example, it didn't have a proper MAC-address, and its networking was effectively out of play.

Luckily, there are couple of options for accessing the BMC directly from OS-side. One of them is IPMItool, but it didn't yield any results. The BMC was stuck somehow. Same story with manufacturer's IPMICFG.

I was almost going to give on on this and was planning to RMA it to Supermicro support in Netherlands. Then a newer version of IPMI BIOS was released and I attempted to upgrade into it. Same story, Linux utility crashes badly causing havoc. As the last move, I USB-booted the hardware into DOS-mode. There is a flash-utility in their ZIP-file for DOS. IT WORKED!! How lucky was that!

The new BIOS-version was sane, it knew its own MAC-address and started operating properly. I was so happy! :-)

Who would have thought, that DOS was abandoned almost 20 years ago, and it once more saves the day.


Is Apple iPhone screen size really too small?

$
0
0

The common consensus is that iPhone screen is too small. For example a Finnish journalist wrote (article is in Finnish), that "Soon iPhone will suit me too". As everybody is expecting a bigger screen iPhone to be released. I've had enough and will blog about that.

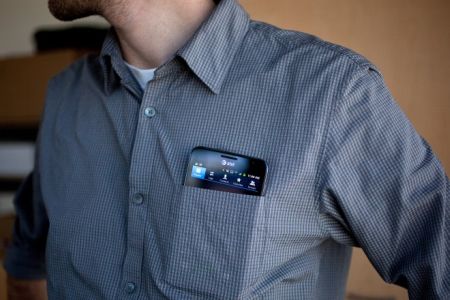
I'm saying, that the iPhone screen-size is pretty good and doesn't need to grow much bigger. I'm agreeing what Tim Cook says Apple struck on right screen size with iPhone 5. Currently 4S and 5S -sized phones fit into everybody's pocket. Example:

Image courtesy of iClothing.

Or in a Wired review Samsung Galaxy Note - Big Phone, Big Hassle:

Image courtesy of Wired

If that doesn't look ridiculous, then I don't know what does. That's the direction you want to go by crying "too small screen" all the time!

Let's study history a bit. In May 2014 Apple Insider had an article Before Apple's iPhone was too small, it was it was too "monstrously" big. Yeah, that's right! The is evidence, that the screen size was never just the right size. Still a number of studies show, that people are not happy with current screen sizes. Example:
In hist article How would you feel if the iPhone 6 didn't have a bigger screen?
"I can say my iPhone usage has decreased over time because it's just too small for me now"
- Chris Parsons

Or example 2:
People want their next phone to have a big-a** screen, survey says

Or example 3, Sales of those ridiculously big phables are way up:
Phablets Will Outnumber Tablet Sales Three To One By 2018

So, pretty much everything is in line with people screaming to have bigger screens for their mobile appliance. How about a reality check. ZDnet has a review of best tablets (Top Android tablets (April 2014 edition)), their list is:

  1. Samsung Galaxy Tab PRO 10.1
  2. EVGA Tegra Note 7
  3. Amazon Kindle Fire HD
  4. Amazon Kindle Fire HDX
  5. The Google Nexus 7

Or Amazon Best Sellers in Tablets:

  1. Kindle Fire HD 7", HD
  2. Apple iPad Mini 16GB
  3. Apple iPad Mini 16GB
  4. Apple IPAD AIR WI-FI
  5. Cheapest Android KitKat
  6. Apple Silver IPAD AIR WI-FI
  7. Kindle Fire HD 7"
  8. Apple 7.9-inch iPad Mini Retina
  9. Apple IPAD AIR WI-FI 32GB
  10. Asus Google Nexus 7

Now there is a pattern. People want something that has 7" screen. In ZDnet top-5 has only one 10" tablet, in Amazon #4, #6 and #9 are all iPad Airs with 10" screen. Everything else is 7".

It looks like iPhone has too small screen, because it is not 7". Feel free to say I'm wrong, but I think general consensus has it wrong. They're expecting iPhone to be something that it isn't.

u-12 pre-SP100 exploits in a single tool

$
0
0

I created a new tool to obsolete the classic B593cmd.pl ping-exploit tool. I wrote that one almost a year ago to run any commands on your B593. That could be used to lift IPtables restrictions or get your sshusers.cfg contents.

Now that Mr. Ronkainen found out that pre-SP100 firmwares have another flaw, which is much more simpler to exploit, I wrote a tool to combine both of them into a single package.

Neither one of these work in SP100+ firmwares, but not to worry! They have SSH-port open for full access anyway. So ... getting a SP100+ firmware into your box should be your target anyway. This tool can help you gain access to your box.

The B593_exploit.pl tool is at http://opensource.hqcodeshop.com/Huawei%20B593/exploit/latest.pl. In the top of the file there is a list of Perl-modules it requires to run. You will get the complaints, if any are missing. Usage:

./B593_exploit.pl --help
Usage: B593_exploit.pl
--help|-h       This help
--run-cmd       Run a command: pre SP-100 ping-exploit
                to run any command via web-console
--telnet-login  Login via telnet: lift IPtables firewall from telnet and login

Ping-exploit -mode

This is the classic. Run example:

./B593_exploit.pl --run-cmd 192.168.1.1 admin "iptables -nL INPUT"

There are couple of bugs fixed, it should be more robust and has --debug -mode in it.

Telnet-exploit -mode

This is the newer one. Run example:

./B593_exploit.pl --telnet-login 192.168.1.1
Attempt 1 telnetting to 192.168.1.1


BusyBox vv1.9.1 (2012-03-01 14:00:34 CST) built-in shell (ash)
Enter 'help' for a list of built-in commands.

#
iptables -nL INPUT

Ok. It's not a full telnet-client like you'd a regular telnet to be. This emulates one with Perl's Term::Readline, so your vi won't work or tab-based command-line completion. However, it has enough power in it to allow you to run commands and display contents of the files or fiddle with your IPtables.

In my next post I'm about to release a tool for editing and storing values of your curcfg.xml. This is a prerequisite, getting to the prompt and running stuff on the prompt is a must-have.

Introducing curcfg_tool: Utility to make changes to your configuration

$
0
0

As I have promised a number of times to number of people. Here it finally is! The first version of my tool to alter your B593 configuration. With this tool you can change admin passwords for web GUI and SSH to something of your liking. It does not (yet) convert plaintext passwords into encrypted ones, but it successfully writes the changes to flash, thus making them permanent.

Prerequisites

  • Huawei B593 u-12
  • Access to your box for running commands, telnet/SSH are really good options for this
  • While at Busybox sh prompt, internet connectivity via the mobile interface (4G/3G/2G)

Getting the tool

The MIPS32 binary version suitable for running at your B593 is at http://opensource.hqcodeshop.com/Huawei%20B593/curcfg/latest. The C source code is also available at: http://opensource.hqcodeshop.com/Huawei%20B593/curcfg/

  1. Log into your box
  2. (recommended) Change into directory /upgflash/
  3. Download the binary into your box:
    wget -g -v -l curcfg_tool -r "/Huawei%20B593/curcfg/latest" opensource.hqcodeshop.com
  • As you can see, Busybox has a mighty quirky wget!
  • Anyway, that command will download the tool from the above URL and place it to the current directory with local name curcfg_tool.
  • Also note, that your box must have a functioning Internet access for download. The only other viable option is via FTP-hack. The environment is very limited and file transfers are restricted heavily.
  • Make sure, that the file is executable:
    chmod a+x curcfg_tool
  • Running the tool

    Now that you have the thing sitting there, run it:

    # ./curcfg_tool
    Usage:
    -V                     - Print version information
    -cw <base64 encoded web gui password>  - set password
    -cs <base64 encoded SSH password>      - set password
    -w                     - write changes to flash (default: don't write)
    -fi <file name>        - input file (default: read from flash)
    -fo <file name>        - write changes (default: /tmp/flashinfo.bin)

    An example of resetting the web-GUI password would be:

    # ./curcfg_tool -cw f5338SA1kb4= -w
    Read data: addr = 0xe00000, len = 0x4 ...
    Begin write to file
    Export done
    Reading 25785 bytes of config
    Read data: addr = 0xe00000, len = 0x64bd ...
    Begin write to file
    Export done
    Writing 25785 bytes of config
    /tmp/flashinfo.bin size = 25790 Bytes
    Read file done
    Begin write to flash
    Load file done

    The magicical Base64 encoded 3-DES encrypted string f5338SA1kb4= is "admin" in plain text. After a reboot (just say reboot at prompt), you can login into your web-GUI and change the password into something of your liking.

    What next?

    That's pretty much it as of now. If you don't like your operator designated passwords, you can change them.

    How do I ...

    • ... see what my current password is:
      You cannot. Encryption key is not known for pre-SP100 firmware and SP100+ firmware is using double encryption with 3-DES and AES and entire flow of information is not yet known.
    • ... access the prompt of my box:
      See B593_exploit.pl for details.
    • ... access the prompt of my box, but I have SP100+ firmware and don't know any of my passwords:
      You cannot. Yet. Currently known exploits have been fixed preventing access.
      However, in this case the real question seems to be: "How did you get your box running in the first place?"
    • ... run the B593_exploit.pl -tool, my Perl isn't working:
      You may want to install all CPAN-modules the script requires. Also skip the Windows and use a proper computer.

    iOS 8 upgrade on iPhone 4S

    $
    0
    0

    Being an old geezer, I typically upgrade my iPhone firmware via USB-cable. Wireless users need to wait for the upgrade to happen, USB-people simply plug the cable and go. Also it is a very robust method and less things will go wrong than doing it wireless. Yeah, right!

    So I plugged my phone in. Made sure, that I had latest iTunes version running and that a recent backup was made. Then, DÄNG!

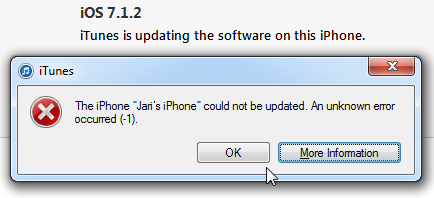
    Yeah. Crap! The iPhone could not be updated. An unknown error occurred. Really? Is it possible to be more vague? Next to frustration, the next thought that goes through my mind is: "Did I brick it!!! Is it still salvageable?".

    Quite soon I had a positive signal:

    Phew! iTunes announced, that the device is in recovery mode. Somewhere before it actually started the process, there was a question "Do you want to upgrade software and restore backup?" In reality it was a non-question, pretty much the only choice was "Ok". Looks like I didn't manage to get a screenshot of that.

    The actual recovery process took a very long time. At the time I didn't realize, that it wasn't a "recovery" by definition. It was a simple iOS install. The next iTunes said was:

    I'm not sure if this is part of the iOS 8 kill-switch -procedure or is that a regular thing to gain Internet access via 3G, but the installation refused to continue before I had successfully entered the PIN-code for my SIM-card. Then iTunes was ready to start restoring my precious data to the device:

    At Apple there is a known reality distortion field, making a nice guestimate of 3 minutes for the restore time. After 15 minutes, the best guestimate was less than 1 minute. Nevertheless, I really had nothing else to but to wait for the restore to complete. Finally it said:

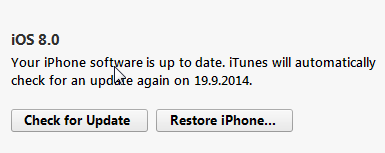
    Oh yes!! I didn't brick it after all. I simply took the long route to the end.

    It really wasn't worth the update. The only really noticeable thing is the voice button in messaging and the fact, that it drains my battery much faster than my previous iOS 7 did. But who would have guessed that would happen, or ... iOS 7.1 makes everything faster — including your battery drain @ 9to5mac.com. So, does that really happen every time they release an upgraded iOS-version? :-)

    New features to curcfg_tool [Failure]

    $
    0
    0

    The original post about curcfg_tool.

    So I decided to add couple of new features to my tool. However, neither of of them work. :-(

    Asiantuntijakaveri-blog introduced hack to run commands on boot: Persistent customizations to Huawei B593u with stock firmware. I added a feature to do that:

    ./curcfg_tool -rc "update-westerneurope.huaweidevice.com ; /upgflash/init.d/rc.local" -w

    The flaw is in the httpupg-command startup. It takes the server address from curcfg.xml, but it doesn't escape it properly. This makes it possible to piggy-back any command on it. The thing is, that in my B593, the automatic firmware upgrade does not run automatically. I can go trigger it manually. At that point it runs my script I created at /upgflash/init.d/rc.local. My hope was, that system would run it automatically on bootup, but it doesn't.

    Another thing I added was NTP-server change. I don't know where the list comes from, in my case it is completely ridiculous. However, the source for information is not fromcurcfg.xml. For example:

    ./curcfg_tool -ntp1 ntp.dnainternet.fi -ntp2 fi.pool.ntp.org -w

    ... doesn't change anything. The new servers don't appear at the list in GUI, nor the system doesn't update time from them.

    Crap! Both attempts failed miserably. Please drop me a comment if you have anything to add to those ones. 

    Asus mobo BIOS upgrade loses Intel RAID-configuration

    $
    0
    0

    One of these days, I went to see if my motherboard has a newer BIOS. It had, and since I had not upgraded the BIOS after building my PC, I chose to go for upgrade.

    This is one of the newer model PCs. You download the file, put it into a FAT-32 formatted USB-stick. Reboot the computer and enter UEFI-setup screens. One of them has an option to display the contents of the USB-stick and load the file, upgrade the BIOS and ... reset the settings and reboot. Wait a minute! Did I just say reset the settings. Yes.

    Guess what happened to my Intel Rapid Storage Technology RAID-1 -setup. :-(

    Crapper! I didn't see that one coming. Now I remember again why I typically don't use motherboard "fake" RAIDs. Also, by the looks of it I wasn't alone with this: RAID1 changed to AHCI after BIOS update. Also, somebody with a Dell computer was experiencing something similar in the Intel's own discussion boards: Raid 1 rebuild with Rapid Storage Technology. I checked the manuals Intel® Rapid Storage Technology (Intel® RST) User guides, but didn't see anything that would help. Self-help seems always to be the best option anyway.

    I turned the S-ATA mode back to RAID:

    ... but trying to re-create the RAID-1 volume seemed a bit dangerous:

    The part where it says "Warning: All data on selected disks will be lost" kind of gets my attention. I didn't want to go that way.

    Booting to Windows worked. Looks like drive(s) don't have any headers and if necessary, can act as a single drive:

    Naturally when Windows sees two drives instead of one, it means that there is no RAID. To get this one fixed I started Interl Rapid Storage Technology user interface. It has the option to create RAID volume on RAID-ready drives:

    More importantly, it has the possibility of not erasing data on a single disc:

    When accepted, the rebuild process starts. It will migrate data for hours:

    When it finishes, there will be only one drive left:

    As the end result, the BIOS was upgraded, RAID-1 was rebuilt and I was happy again. All it took was 6 hours of rebuild time and a lot of stress! :-)

    Unboxing iPhone 6

    $
    0
    0

    My iPhone 4S spent a while in the bottom of the lake. It worked under water and I got it out dried it, and it seems to work. Apparently something is short-circuiting as it doesn't stay turned off for more than a second. Mostly it does work, but I wanted a new one and went for a iPhone 6. It is impossible to get one without queueing for weeks. So, I put my order to Apple's on-line store and waited the weeks and then TNT-guy dropped the thing at my door. Nice! New toys! :-)

    It looks like this in a box:

    The phone is wrapped into plastic and there is the Apple-tab at the end:

    In the box there are also charger, Lightning USB-cable and ear-plugs/headphones (I don't much like them):

    The first idea that comes to my mind, is that "darn it's light!". Because the phone is much lighter than 4S. It is much bigger phone, but still so light. Nice! Here's the comparison:

    One thing I had to do was to drive to my telco's store and get my SIM-card changed. 4S eats micro-SIMs, but this one wants a nano-SIM. Darn! There is the traditional Apple SIM-slot in the side:

    Finally I got the first smoke out of it:

    I chose to go for iTunes, but it didn't like me:

    Crap! That's really not encouraging to see that kind of message. My solution was to un-plug it and try again. It worked! I got to the point where it was possible to set up the phone from my previous backup:

    Yet another cold shower. It really paid off to upgrade into iOS 8.1! :-) NOT!

    The solution was to set the phone as a new and do an upgrade:

    After iOS 8.1 was running, I did a full reset to the phone and tried the iTunes restore-thing again. This time everything was ok. The restore ran much faster then on 4S. I have over 10 gigs of stuff to restore. Finally:

    Nice! The screen is much bigger, and restore did place my icons to their original locations. That sure looks funny on a much bigger screen! :-)

    Now that the phone was running, it was time to look some bonus things. I got a Vaja case for it:

    That should protect the very expensive phone (unless dropped into a lake).

    Plugging cords is not nice at office environment, so I normally sync and charge my stuff with a lighting-dock. It was visible in couple of earlier pics, but here are more:

    My choice is Macally charge & sync dock Designed for Lightning iDevices and it works nicely on my iPad too:

    They don't sell those in Europe for reason unknown to me. I guess it has something to do with electricity. As I ordered mine from US, it has an US transformer in it. Luckily a dock doesn't need electricity for anything, and charging fully works from my PC.

    Ok, enough accessories, back to iPhone 6. It's a darn good one. It has to be the best iPhone so far! It does well on Carat battery statistics, they don't actually give out the results, but it was the best of iPhones in that. There are some results in Finnish newspaper article. On top of that, the screen (altough it is too big) is really good, camera is good and the thing runs apps very fast. I totally recommend gettin one!


    Adding capacity to Samsung Story USB-drive

    $
    0
    0

    To make sure my data is properly protected, I keep a habit of lifting off monthly backups from my NAS to an external drive. I have couple of Samsung Story USB-drives dedicated for that purpose. This worked nicely for many years until I hit the brick wall. My combined monthly backup didn't fit the capacity of 1,5 TiB. It sure would be nice to have a "shingled" 8 TiB drive for that kind of storage, but unfortunately they are not available yet. See article New “Shingled” Hard Drives Hold Terabytes For Pennies A Gig.

    In case you don't know what a Samsung Story drive is, it looks like this:

    What I did was to pop the hood of my Story-drive to see what it had eaten. Very simple setup indeed, I went to a nearby store and got replacement 3 TiB WD Green drives (WD30EZRX).

    Here is how the process goes. First pop the hood:

    Quirk warning! The aluminium hood is held in place by 4 pieces of T9 Torx screws. The quirk here is, that T9 is not a common size. If you go to an average store, you'll find them having the smallest size of T10 (which is too big for this). Even my Apple repair kit doesn't have a T9, it has T8 and T10 pieces. I've taken apart Nokia phones, and they tend to have weird Torx-sizes, that's why I also have a kit which has T 4, 5, 6, 7, 8, 9 and 10. So, your biggest hurdle is to find a T9 somewhere.

    When you have the aluminium cover removed, it'll look like this:

    I included a blow-up of the warranty void -disclaimer sticker. I don't think Story drives have been manufactured for a while, so the warranty should be void anyway. Un-surprisingly, inside the box there is a Samsung 3,5" HD-drive, a HD154UI. Under the aluminium hood you will also find a plastic bracket. It just fills up the space making the actual drive fitting nicely and not moving. The bracket has a total of 8 plastic tabs holding it in place. I simply pushed one pair simultaneously from both sides, and I was able to lift the plastic holder up a bit. Then I just moved my fingers to the next pair and it moved more. The plastic thingie will look like this:

    When the plastic bracket is gone, you can simply lift the drive upwards. It is held in place only by some rubber tabs, but the drive is essentially loose at this point:

    Beware, that the S-ATA to USB -adapter (JMicron) is connected to the front-panel with a wire. That acts as a power on/off -switch for the entire thing. There are 4 wires in the connector, but I think only 2 of them are in use:

    It is a pretty common connector and comes off easily by simply pulling it. The next thing is to remove the S-ATA / USB -converter -thingie from the drive. It is attached by a single #1 Phillips screw:

    After the scew is gone, the entire converter-board will come loose from S-ATA -connector. Now that you have the hard drive almost completely stripped of all extra goodies, the last thing is to remove the rubber tabs and the kind-of-screws that hold them in place:

    The rubber tabs or "pillows" come off by simply pulling them off from the sides. The metal "poles" are another story. They look like #1 Phillips, but the alloy they're made of is of poor quality. You can assume that a screwdriver isn't the primary tool here. I actually used pliers to turn them loose. Now everything is removed from the Samsung-drives, it's time to go big:

    Just put the 4 metal screws back, fix the S-ATA / USB -converter board, attach the power-switch -cable, the rubber tabs and put the drive back to it's place. Like this:

    After attaching the aluminium cover, it was a moment of truth. Does it still work? I plugged the power-cable and USB-cable back and went to my Linux:

    kernel: usb 3-1.2: new high-speed USB device number 5 using xhci_hcd
    kernel: usb 3-1.2: New USB device found, idVendor=04e8, idProduct=5f06
    kernel: usb 3-1.2: Product: Samsung STORY Station
    kernel: usb 3-1.2: Manufacturer: JMicron
    kernel: usbcore: registered new interface driver usb-storage
    kernel: scsi 9:0:0:0: Direct-Access     Samsung  STORY Station         PQ: 0 ANSI: 2 CCS
    kernel: sd 9:0:0:0: [sde] Very big device. Trying to use READ CAPACITY(16).

    Looked really good! Checking to see what my new drive had out-of-the-box:

    # parted /dev/sde print
    Error: /dev/sde: unrecognised disk label
    Model: Samsung STORY Station (scsi)
    Disk /dev/sde: 3001GB
    Sector size (logical/physical): 512B/512B
    Partition Table: unknown
    Disk Flags:

    It had nothing. Full of zeros. Not even a partition table. I'd launched the parted and went for GPT and a new Btrfs partition:

    # parted /dev/sde
    GNU Parted 3.1
    Using /dev/sde
    Welcome to GNU Parted! Type 'help' to view a list of commands.
    (parted) mklabel gpt
    (parted) mkpart "Backups" ext2 17.4kB -1
    Warning: You requested a partition from 16.9kB to 3001GB (sectors
    33..5860531215).
    The closest location we can manage is 17.4kB to 3001GB (sectors
    34..5860531215).
    Is this still acceptable to you?
    Yes/No? yes
    Warning: The resulting partition is not properly aligned for best performance.
    Ignore/Cancel? i
    (parted) quit
    Information: You may need to update /etc/fstab.

    Continuing with setup:

    # ls -l /dev/sde*
    brw-rw----. 1 root disk 8, 64 Dec  8 23:07 /dev/sde
    brw-rw----. 1 root disk 8, 65 Dec  8 23:06 /dev/sde1

    # mkfs.btrfs /dev/sde1
    Btrfs v3.17
    See http://btrfs.wiki.kernel.org for more information.

    Turning ON incompat feature 'extref': increased hardlink limit per file to 65536
    fs created label (null) on /dev/sde1
            nodesize 16384 leafsize 16384 sectorsize 4096 size 2.73TiB

    Looking perfect! The JMicron thingie could handle all of the new capacity, Linux saw the USB-converter nicely:

    # mount /dev/sde1 /mnt/usb/
    # df -k /mnt/usb/
    Filesystem      1K-blocks  Used  Available Use% Mounted on
    /dev/sde1      2930265588 16896 2928139456   1% /mnt/usb

    Cool! Really big numbers for capacity. Now I can manage with these couple years more.

    HOWTO: Build a Proper LAN with Copper Ethernet Cabling

    $
    0
    0

    Having a reliable LAN is an essential part of your Internet connection. Going for a wireless solution is fast to build (pretty much plug and use), but as everybody is running one nowadays, the 2,4 GHz band is getting crowded. It is possible to go 5 GHz which is less crowded, has more capacity and is less prone to be blocked by your household microwave oven sending noise to 2 GHz band.

    The only real option is to use the wireless toys for mobile devices and tablets, but use old fashioned wired connections for real computers. The catch is, that it is pretty difficult to build and costs more than your average Wi-Fi access point.

    Part 1: Planning

    What is needed for LAN-build:

    • Cabling:
      • Lots of it! I rolled over 130 meters of siamese copper cable into my project.
      • With siamese cable I get two Ethernet connections on a one cable.
    • Patch panel:
      • This is the other end of the line. Typically placed into server room or rack.
      • Here is the one I got.
    • RJ-45 wall sockets:
      • This is where you connect your equipment into. I used twin-sockets for twin-cabling.
      • The recommendaton I had was to go for LexCom 250 (apparently same as Actassi here). I couldn't use them in my project as they had very long delivery time. They were bit more expensive too, but I've gladly paid for them if only I had gotten any.
      • I went for ABB FOT6208 which were easily available. I later learned, that they are not so handy to install as LexCom would be.
    • Ethernet switch:
      • That will distribute your LAN into every wall socket.
      • Any gigabit ethenrnet switch will do, even the cheapest ones.
      • I got a HP 1910-24G. It has management via web in it and a fan. When running, the fan makes noise, but I'm placing it in a dedicated room inside a rack, so I need it to function at all temperatures.
    • (optional) 19" Rack:
      • This is handy for the patch panel and switch. A small 4-5 U telco-sized rack will do.
      • This is the one I got.
    • Cable routing plan:
      • An idea where you can route the cables and where to place the wall sockets.
    • Lastly:
      • Basic cabling skills and lot of enthusiasm.
      • Typical environments will require drilling holes, cutting cables and combing the twisted pairs ouf of them.
      • To hide the cables in rooms, I used plastic cord cover. On tight corners I drilled hole into it and used a screw. The cover I used is self-sticking, but I know from experience, that the glue won't stand the test of time. Ethernet cable is quite heavy for any sticker to carry. 

    All that should cost less than 1k €.

    Part 2: Implementation

    I started by drilling couple of holes for the cable. Then I attached the wall sockets into drywall:

    This is what my siamese cabling look like:

    That's your basic 4 twisted pairs in a cable. In the middle of the cable there is a plus-shaped plastic filler. It makes the cable flex a little bit better. Ethernet cabling shouldn't have too tight corners anyway, but its different story to lure the cable through ceiling or wall if it doesn't give way at all. 

    My sockets and RJ-45 connectors are ABB FOT6208 toolless:

    It is quite easy to hook one up:

    I used T568A pin-to-pair assignment. You can notice that from the connector pic. The colour coding of cables match the upper row at the connector.

    My siamese cabling had text on one of them. It was possible to identify the other pair when connecting. See how it contains the amount of meters rolled out:

    At the patch panel I have Krone connectors:

    A specific tool is required to make the cabling stick:

    Even though a single cable is quite thin, the connection is robust. This is how the patch panel will look like when all the pairs have been connected:

    I always tested every connection before proceeding:

    When confirmation was made, that the connection would work ok, it was time to put the wall socket together:

    That was it. It was just about repeating the same thing for every cable and wall socket.

    Part 3: Wrap-up

    Was it worth it? Absolutely!

    Now I have properly functioning gigabit Ethernet in every room at the house. It works so much better at high speeds than any Wi-Fi I've ever tested. 

    A collegue really loved my home LAN. He said, that not all businesses have installation of that scale:
    "The most overkill home LAN installation"
    - Thomas C.

    My Weather Station setup

    $
    0
    0

    As you already know, I love all kinds of gadgets. When it comes to weather, simply having a reading of outside temperature isn't nearly enough for me. I've had a weather station running for a while, but now that I connected into the on-line world, its time to publish my setup.

    The unit I'm running is a WS2357 from La Crosse Technology. They say its a "Pro family" product, but still is very affordable. I paid 150,- € for mine. On the link there's all the tech specs, but it is your basic unit having temperature, pressure, humidity measurements indoors and outdoors. Also for outdoors, there is a wind direction and speed meters and a rain gauge. It is mainly battery powered and data from outside to inside can be transmitted either wirelessly (that's how I do it) or with a wire. Apparently the max. length for the wire would be 20 meters, which exceeds my setup. But for a wireless transmission, the limit is 100 meters. It works well trough house walls.

    This is what the outdoors temp, humidity, pressure unit looks like:

    This is the "central unit" of outdoors. The size is surprisingly small, but it still holds 2 AA-sized batteries and RJ-11 connectors for wind, rain and indoors. When installed outdoors, it comes with a rain cover which also should insulate it from direct sunlight. This small box is battery powered, but as I never want to climb to my roof to change the batteries, I drilled a small hole for an electric cord, which I soldered into the battery contacts. On the other end of the cord I have a 3,3 VDC transformer acting a battery.

    I'm not happy with the temperature measurement, it reacts too fast when sun starts to shine on it. A properly ventilated cover would do better job. In my previous unit this wasn't an issue.

    The rain gauge looks like this:

    How this operates is very simple. At the bottom of the funnel, there is a small seesaw. When there is enough weight (in form of water) at the seesaw, it will tilt. This empties a cup on the other end and makes the seesaw tilt to the other direction. As it is known exactly how much weight is needed for the action to take place and the area of the unit's intake, it is possible to calculate the amount of waterthat has rained on that particular area and extrapolate that into WMO specs. On the minus side of the rain gauge, it had zero installation brackets. I ended up gluing it into a metal T-bar connected to my setup.

    This is the wind gauge:

    With this one I have no complaints. It is very sensitive and seems to give accurate enough readings. Once when weather turned from +2 into -4 it froze for a couple of days. As there was very little wind, the wind direction didn't change at all. Normally wind direction is a scattercloud, but in this instance wind direction was fixed. The problem was solved when wind picked up. So, it wasn't that bad.

    This is how my entire setup looks like as installed:

    The temperature gauge could be couple of meters higher just to make sure, it wouldn't pick up any extra heat from the roofing on sunny days. I did do some measurements and that could give a boost to my outside temp readings if there is no wind at all.

    To get the unit connected into on-line world, I created an account at Weather Underground. I'll transmit the readings from the unit there. To hook the unit up into my Linux-box, I had to a lengthy cable between the indoors unit and my computer. I lucked out with the protocol, as it is RS-232. I simply cut the cable at the D-9 -connector, and soldered an extension cord of 17 meters. The pin ordering is as follows:

    The rule-of-thumb max. length for 2400 bps data rate is 60 meters (according to this table), so my cabling worked out perfectly.

    For the software at Linux-end I went for Open2300. It is an open-source set of tools to extract necessary information from my station and publish them to The Net. I'm using a simple cron-job for it:

    # Weather Underground update
    */10 * * * *  ~/Open2300/wu2300 ~/Open2300/lacrosse.conf

    On the Wunderground-end I had major issues. First it didn't receive any of my transmissions. It kept insisting "INVALIDPASSWORDID|Password and/or id are incorrect", which wasn't true. I knew exactly what the password was. After couple of hours, it started working. I'm guessing their data receiving front-end gets the new accounts in a batches, and they are nowhere near real-time.

    When my data started flowing, the web-front said:

    ... which was more than funny. If it wasn't getting any readings, why it says that the most recent one was received a minute ago. :-)

    After solving all these minor glitches I was real happy with this setup. Now my station participates in a community of 60k stations all over the world. Also I can check what's the weather like while still keeping my eyes on my precious computer. :-)

    Huawei B593 u-12 firmware spreadsheet

    $
    0
    0

    Since there has been no updates for Mr. Bjørn Grønli's spreadsheet, I chose to continue his work.

    The link is https://docs.google.com/a/hqcodeshop.fi/spreadsheets/d/1ZJsy0q-8tmR8m32d1bCHkSv1neGVtA5v5TU4qVczH0Q

    I did try out a number of SP104 and SP105 T-mobile (German Telecom) firmwares and found that they are really poor. 3 Italy was a pretty poor firmware, as I had problems logging in! Polkomtel's SP103 was a solid performer, but after a round trip, I went back to Telia's SP102.

    Please drop me a comment if something is wrong or new columns should be added, or if I'm missing a firmware in the list. My idea is to try to keep this up to date with firmware information and I will appreciate any help from you.

    Replacing iPhone 4S battery

    $
    0
    0

    I really don't understand why people complain about iPhone screen size being too small. Personally I'd rather carry a phone, not iPad. Also it happens that iPhone 4S is one of the best phones Apple ever manufactured, it is robust and take mis-handing, it is stable and never crashes on iOS 7. You cannot say that about previous or later phones. And IMHO the best feature about 4S is that it simply has the correct size!

    My unit started showing symptoms of aging. Battery charge time was over 3 hours from 20% capacity to full, which felt like much longer time when my phone was new. I'm using Battery Doctor app to monitor the charging to keep my battery in a good shape, but the fact of life is that batteries wear on usage. It was time for me to replace it.

    Going to an authorized Apple service was absolutely ouf of the question. I've always wanted to see what's inside my iPhone! :-) The absolutely best thing is to get the new battery and tools for the service from iFixit.com. They even provide a very nice guide for the replacement job iPhone 4S Battery Replacement. As the obligatory warning part I'll simply say, that there are very small parts inside and provide this pic as proof:

    That's set of iPhone screws on an euro 1 cent, which is on top of US quarter. The leftmost two screws are Phillips-head battery connector screws and the rightmost screws are original Apple Pentalobes. This should scare you away from ever attempting to do any of this stuff by yourself. If it doesn't, please read forward! :-)

    So, I put in my order and in a couple of weeks the box arrived from USA. The box contained:

    • The replacement battery
    • Phillips-head screwdriver to remove the battery connector and insert the liberator screws for the back lid
    • Pentalobe-head screwdriver to remove the back lid
    • Plastic tool for prying the battery loose from the sticky stuff it is fitted into

    The first task is to remove the back lid. It can be done by removing the two Pentalobe-screws next to the bottom dock connector:

    After the screws are removed, the back lid will slide bit upwards, that is away from the dock connector:

    After that the lid should be loose and can be removed without applying force to it. It has some tricky plastic tabs on the sides, so please be careful with those. They're the ones actually holding the lid in place. Don't break them.

    The guts of the phone look like this:

    Next step is to remove the battery. This can be done by disconnecting the battery from the phone and then prying the battery loose from the glue. The battery connector looks like this:

    It is mechanically not a tight one. First remove the two Phillips-head screws and the try to disconnect the connector pins by sliding the connector towards the battery, like this:

    Warning: when the battery connector is loose, it is absolutely certain that you will remove a pressure connector in the process:

    iFixit says "Pay attention to the pressure contact underneath the top screw of the battery connector. This may come loose while prying the battery connector from its socket". I already said: It will come loose! Just don't misplace it. Try to figure out how it was, to get it back in place.

    Then pry the battery:

    It is held in place by reasonable amount of gooey sticky stuff:

    Now you have removed the battery! It is another story of getting it all back. :-)

    The battery looks like this:

    Batteries from left to right: old backside, new backside, old front side, new front

    Not much of a difference with the old and the new one. Based on the LMG 08/2013, my new one is manufactured about a year ago. It had 40% charge when I turned my phone back on, I guess that's ok.

    Anyway, to put it back together, put the battery in it's slot and try to figure out how the connector cable goes so that it would be possible to put the connector screws back. Before actually placing the battery contactor, concentrate on the loose pressure connector. It should look like this:

    Then put the battery connector and try to put the top screw in so, that it would hold both the battery and pressure connectors in place. Then put the bottom screw in. When done correctly it should look like this:

    Then the last step is to put the back lid in, slide it to place and liberate your iPhone with the new Phillips-head screws:

    After that you're done. Congratulations on your new battery!

    When I first turned my phone back on, it didn't find my SIM-card. I don't know what happened, but everything else worked, except it never asked for my SIM PIN-code, nor ever found any telephone operators. I fixed the issue by shutting the phone, going to airplane mode didn't do the trick. On next power on, it did ask for my SIM PIN-code and found my telco quite soon.

    My thanks goes to iFixit for their excellent guide. I simply wanted to do my own to fill in the gaps they left.

    Password encryption

    $
    0
    0

    A fellow B593 hacker Mr. Ronkainen from blog.asiantuntijakaveri.fi informed me about his findings regarding /var/curcfg.xml password encryption. This is something I did already spit-ball with him in comments, but this time he had something concrete to show.

    This is for decrypting an FTP-password. Since you can set your own, you definitely know what the plaintext password is. His findings are:

    exe->Data_DbDecrypt(nil, "llxYjYnY:\021\003\2324\275\241\233Wu\353$Vx;\333#", "", "" <unfinished ...>
    exe->strncpy(0x7facddd8, "llxYjYnY", 8)          = 0x7facddd8        (Data_DbDecrypt)
    exe->strcpy(0x7facdaf8, "12345678")              = 0x7facdaf8        (Data_getProductInfo)
    exe->strncpy(0x7facdb01, "12345678", 9)          = 0x7facdb01        (Data_getKey)
    exe->strncat("12345678", "llxYjYnY")             = "12345678llxYjYnY"    (Data_getKey)
    <... Data_DbDecrypt resumed> )                   = nil
    exe->strcpy(0x4ce009, "BBBB")                    = 0x4ce009

    The first call is for the raw input data. It clearly contains 8 characters, a colon (:) and something encrypted after it. Then there is a surprising part, call to a function named Data_getProductInfo() returning hard-coded 12345678 every time. Based on the code, the "product info" is simply concatenated into the Base64-decoded 8 char prefix, forming a 16 byte encryption key.

    I've already speculated, that they changed encryption in SP100+ from 3-DES to AES. Based on the function names in firmware libries, combine that with knowledge of block ciphers and give it a go with AES-128 ECB with the above keying. Hey presto! It works! :-)

    I wrote a public tool for doing password encryptions/decryptions: http://blog.hqcodeshop.fi/B593/password_recover.php The sources for my web-thing are also there, if you want to use that by yourself.

    As you can see from the form, I cannot work with the previous 3-DES stuff. It's simply because I don't know what the key/IV are. There is also another thing with web-GUI and SSH-passwords. They are not using the above keying mechanism. My speculation is, that they are using AES-256 (possibly in ECB-mode) for those, but I have no details about the key.

    If you want to test the password recovery, you'll need your /var/curcfg.xml at hand. Pick an encrypted password from that, for example:

    <X_FTPServiceInstance InstanceID="1" Username="test" Password="bU50RkQ1T2o6UNkuA7Bdj40/TiNehA6fDw==" FtpUserEnable="1" Privilege="2" Path="usb2_1/../.."/>
    or
    <WEPKeyInstance InstanceID="4" WEPKey="bU50RkQ1T2o69goRBo2nWOh00YDVCHLGDw=="/>

    Select web-form Target as FTP-user, copy/paste the value from XML Password-field into Base64-encoded and klick decrypt. It should give you "test" as Plain-text value. There is another example for Wi-Fi WPA-key, it says WEP in the XML-file, but we can ignore that.

    I'll keep investigating the other passwords too. Mr. Ronkainen suggested, that something in the box could be encrypted with PKCS#1, but the block size is off, at least in passwords. Stay tuned for more updates.

    B593 u-12 /etc/ PEM-files explained

    $
    0
    0

    During the quest of hacking my u-12, Mr. Ronkainen from blog.asiantuntijakaveri.fi insisted, that the certificate files in /etc/ are actually used. My personal belief was, that the purpose of having those would be something not-so-important. It turned out, that I badly misjudged the situation.

    My firmware has these files:

    # cd /etc/
    # ls -l *pem
    -rwxrwxrwx    1 0        0             963 privkey.pem
    -rwxrwxrwx    1 0        0             963 privkey.b593pem
    -rwxrwxrwx    1 0        0            3700 cachain.pem
    -rwxrwxrwx    1 0        0            1751 b593cpekey.pem

    Please note, that the files are in a Read-Only -partition. They are not unique to my device! Your u-12 should have the exactly same files like I do. Also note, that pre-SP100 firmwares are using different encryptions and may not have those (I didn't bother to check).

    The cachain.pem is the trivial one. It contains two CA-certificates issued by Huawei expiring 2040 or so. That is a very common PKI-procedure to have the public certificates in a device to make sure, that the actual certificate being used can be verified to a trusted root-CA. There is very little interesting about that file.

    However, the remaining PEM-files are more interesting. The exact purpose of b593cpekey.pem is yet unknown. It is an 3-DES encrypted private key to something. If you want to take a peek into the file, the encryption password is CPE-B593-12 as Mr. Ronkainen dug out of the libraries. A command like this will tell us more:

    # openssl rsa -in b593cpekey.pem -noout -text -passin pass:CPE-B593-12
    Private-Key: (2048 bit)
    ...

    It is a 2048-bit RSA key. If you know what the key is used for, please tell us.

    The remaining files privkey.pem and privkey.b593pem are exactly the same. To me it looks like poor engineering. Libraries seem to be using the latter filename, but my guess is, that somebody is using the first one too. The password for this private key was also recovered by Mr. Ronkainen, it is lteb593. Basic information recovery:

    # openssl rsa -in privkey.pem -noout -text -passin pass:lteb593
    Private-Key: (1024 bit)
    ...

    Hm. handy, but the really interesting part is where this file is actually used. This information was recovered by Mr. Ronkainen with looking at the GUI admin traffic via Wireshark.

    If you go change the admin password at System -> Password change (the frame source would be http://-the-IP-here-/html/management/account.asp), you can see the HTML containing tags for loading a number of JavaScript files, the most interesting ones are /js/account.js and /js/rsa.js. The actual password change code from account.js is:

    function AddSubmitParam(SubmitForm,type)
    {
      var cfgUsername = ADMIN_USER_NAME;

      SubmitForm.addParameter('cfgUsername',cfgUsername);
      SubmitForm.addParameter('Userpassword',MyRSAEncryptB64(getValue('id_cfmPassword')));
      //SubmitForm.addParameter('Username',ADMIN_USER_NAME);
      SubmitForm.addParameter('OldPassword',MyRSAEncryptB64(getValue('id_oldPassword')));

      SubmitForm.setAction('chgacount.cgi?RequestFile=/html/management/account.asp');

    It RSA-encrypts the value from form field with id id_cfmPassword! Wow! They really beefed up their security. The RSA-code is at /js/rsa.js and it contains:

    // Return the PKCS#1 RSA encryption of "text" as a Base64-encoded string
    function RSAEncryptB64(text) {
      var h = this.encrypt(text);
      if(h) return hex2b64(h); else return null;
    }

    ...

    //my encrypt function, using fixed mudulus
    var modulus = "BEB90F8AF5D8A7C7DA8CA74AC43E1EE8A48E6860C0D46A5D690BEA082E3A74E1"
                 +"571F2C58E94EE339862A49A811A31BB4A48F41B3BCDFD054C3443BB610B5418B"
                 +"3CBAFAE7936E1BE2AFD2E0DF865A6E59C2B8DF1E8D5702567D0A9650CB07A43D"
                 +"E39020969DF0997FCA587D9A8AE4627CF18477EC06765DF3AA8FB459DD4C9AF3";
    var publicExponent = "10001";
    function MyRSAEncryptB64(text)
    {
        var rsa = new RSAKey();
        rsa.setPublic(modulus, publicExponent);
        return rsa.encrypt_b64(text);
    }

    It surely is RSA PKCS#1 encryption implemented with JavaScript. That's really cool! A complete PKCS#1 library implemented with a completely wrong language. :-) I didn't realize, that having a fully functional RSA-library with JavaScript was even possible, but there it is.

    Next I took the public key modulo and exponent from the above JavaScript-code and used Per Olesen's tool from https://gist.github.com/polesen/2855098 to re-create an actual PEM-file from those ingredients. Mr. Olesen has a nice article Converting RSA public key Modulus and Exponent into PEM file about that.

    The resulting PEM-file is:

    -----BEGIN PUBLIC KEY-----
    MIGeMA0GCSqGSIb3DQEBAQUAA4GMADCBiAKBgQC+uQ+K9dinx9qMp0rEPh7opI5o
    YMDUal1pC+oILjp04VcfLFjpTuM5hipJqBGjG7Skj0GzvN/QVMNEO7YQtUGLPLr6
    55NuG+Kv0uDfhlpuWcK43x6NVwJWfQqWUMsHpD3jkCCWnfCZf8pYfZqK5GJ88YR3
    7AZ2XfOqj7RZ3Uya8wICJxE=
    -----END PUBLIC KEY-----

    and a simple verify run with OpenSSL for both the private and public keys confirm, that we have a pair:

    # openssl rsa -pubin -in privkey.pub.pem -noout -modulus | md5sum
    92e88d0b38fe93cd41a000b3c0b1928e  -
    # openssl rsa -in privkey.pem -noout -modulus -passin pass:lteb593 | md5sum
    92e88d0b38fe93cd41a000b3c0b1928e  -

    Both keys have the same modulo in them, thus, they are the private and public parts of the same key. Excellent! :-)

    Credits go (as usual) to Mr. Ronkainen for his hard work in hacking the B593. Also Mr. Olesen deserves thanks for his ready-made tool (which btw. builds in my Linux easily) for putting the PEM-parts back together.

    Final credits go to Huawei engineers, this time they took data encryption really seriously. However, when you're in a leaking boat, it really doesn't matter if you have the best motor or not, your boat still leaks. In this case the critical information (like encryption keys) are hard-coded, used in every device they manufacture and recoverable in plain-text format. It looks like Huawei is suffering from the weakest-link-in-your-security -syndrom. If your FTP is flakey, you store your SSH-passwords in plain-text format and let people in as they please, they are likely to find this stuff out!

    ... More to follow about SSH and web-GUI user password encryption. This was a very critical find in the path of full disclosure.


    Supermicro IPMI BIOS upgrade fail [Solved!]

    $
    0
    0

    I tried to upgrade my Supermicro SuperServer 5015A-EHF-D525 IPMI BIOS to have the Heartbleed fixed in it. It failed on me. :-( Badly. When I run:

    lUpdate -f SMT_316.bin -i kcs -r y

    The not-so-friendly response is:

    If the FW update fails,PLEASE TRY AGAIN
    update part 0, the size is 0x800000  bytes
    Transfer data ................
    40K bytes      1%ERROR !! BMC did not in correct state
    ERROR:SEND "ReceiveFWData" COMMAND TO BMC FAILED

    It looks like Supermicro's Linux upgrade tool is the culprit. It enters BMC upgrade mode, starts pushing bits to FlashROM, and then segfaults. I tried couple of BIOS-versions, but to make things worse, I was going from version 2.x to 3.x and there was no downgrade possibility anymore. The BMC was semi-concious, but it really couldn't do much. For example, it didn't have a proper MAC-address, and its networking was effectively out of play.

    The worst part of this failing upgrade is, that to get the BMC upgrade mode disabled, you need to pull the plug. If there is electricity connected to the machine, the BMC will stay on.
    Update:
    Also the ipmitool bmc reset cold helps.

    Luckily, there are couple of options for accessing the BMC directly from OS-side. One of them is IPMItool, but it didn't yield any results. The BMC was stuck somehow. Same story with manufacturer's IPMICFG.

    I was almost going to give on on this and was planning to RMA it to Supermicro support in Netherlands. Then a newer version of IPMI BIOS was released and I attempted to upgrade into it. Same story, Linux utility crashes badly causing havoc. As the last move, I USB-booted the hardware into DOS-mode. There is a flash-utility in their ZIP-file for DOS. IT WORKED!! How lucky was that!

    The new BIOS-version was sane, it knew its own MAC-address and started operating properly. I was so happy! :-)

    Who would have thought, that DOS was abandoned almost 20 years ago, and it once more saves the day.

    Is Apple iPhone screen size really too small?

    $
    0
    0

    The common consensus is that iPhone screen is too small. For example a Finnish journalist wrote (article is in Finnish), that "Soon iPhone will suit me too". As everybody is expecting a bigger screen iPhone to be released. I've had enough and will blog about that.

    I'm saying, that the iPhone screen-size is pretty good and doesn't need to grow much bigger. I'm agreeing what Tim Cook says Apple struck on right screen size with iPhone 5. Currently 4S and 5S -sized phones fit into everybody's pocket. Example:

    Image courtesy of iClothing.

    Or in a Wired review Samsung Galaxy Note - Big Phone, Big Hassle:

    Image courtesy of Wired

    If that doesn't look ridiculous, then I don't know what does. That's the direction you want to go by crying "too small screen" all the time!

    Let's study history a bit. In May 2014 Apple Insider had an article Before Apple's iPhone was too small, it was it was too "monstrously" big. Yeah, that's right! There is evidence, that the screen size was never just the right size. Still a number of studies show, that people are not happy with current screen sizes. Example:
    In this article How would you feel if the iPhone 6 didn't have a bigger screen?
    "I can say my iPhone usage has decreased over time because it's just too small for me now"
    - Chris Parsons

    Or example 2:
    People want their next phone to have a big-a** screen, survey says

    Or example 3, Sales of those ridiculously big phables are way up:
    Phablets Will Outnumber Tablet Sales Three To One By 2018

    So, pretty much everything is in line with people screaming to have bigger screens for their mobile appliance. How about a reality check. ZDnet has a review of best tablets (Top Android tablets (April 2014 edition)), their list is:

    1. Samsung Galaxy Tab PRO 10.1
    2. EVGA Tegra Note 7
    3. Amazon Kindle Fire HD
    4. Amazon Kindle Fire HDX
    5. The Google Nexus 7

    Or Amazon Best Sellers in Tablets:

    1. Kindle Fire HD 7", HD
    2. Apple iPad Mini 16GB
    3. Apple iPad Mini 16GB
    4. Apple IPAD AIR WI-FI
    5. Cheapest Android KitKat
    6. Apple Silver IPAD AIR WI-FI
    7. Kindle Fire HD 7"
    8. Apple 7.9-inch iPad Mini Retina
    9. Apple IPAD AIR WI-FI 32GB
    10. Asus Google Nexus 7

    Now there is a pattern. People want something that has 7" screen. In ZDnet top-5 has only one 10" tablet, in Amazon #4, #6 and #9 are all iPad Airs with 10" screen. Everything else is 7".

    It looks like iPhone has too small screen, because it is not 7". Feel free to say I'm wrong, but I think general consensus has it wrong. They're expecting iPhone to be something that it isn't.

    u-12 pre-SP100 exploits in a single tool

    $
    0
    0

    I created a new tool to obsolete the classic B593cmd.pl ping-exploit tool. I wrote that one almost a year ago to run any commands on your B593. That could be used to lift IPtables restrictions or get your sshusers.cfg contents.

    Now that Mr. Ronkainen found out that pre-SP100 firmwares have another flaw, which is much more simpler to exploit, I wrote a tool to combine both of them into a single package.

    Neither one of these work in SP100+ firmwares, but not to worry! They have SSH-port open for full access anyway. So ... getting a SP100+ firmware into your box should be your target anyway. This tool can help you gain access to your box.

    The B593_exploit.pl tool is at http://opensource.hqcodeshop.com/Huawei%20B593/exploit/latest.pl. In the top of the file there is a list of Perl-modules it requires to run. You will get the complaints, if any are missing. Usage:

    ./B593_exploit.pl --help
    Usage: B593_exploit.pl
    --help|-h       This help
    --run-cmd       Run a command: pre SP-100 ping-exploit
                    to run any command via web-console
    --telnet-login  Login via telnet: lift IPtables firewall from telnet and login

    Ping-exploit -mode

    This is the classic. Run example:

    ./B593_exploit.pl --run-cmd 192.168.1.1 admin "iptables -nL INPUT"

    There are couple of bugs fixed, it should be more robust and has --debug -mode in it.

    Telnet-exploit -mode

    This is the newer one. Run example:

    ./B593_exploit.pl --telnet-login 192.168.1.1
    Attempt 1 telnetting to 192.168.1.1


    BusyBox vv1.9.1 (2012-03-01 14:00:34 CST) built-in shell (ash)
    Enter 'help' for a list of built-in commands.

    #
    iptables -nL INPUT

    Ok. It's not a full telnet-client like you'd a regular telnet to be. This emulates one with Perl's Term::Readline, so your vi won't work or tab-based command-line completion. However, it has enough power in it to allow you to run commands and display contents of the files or fiddle with your IPtables.

    In my next post I'm about to release a tool for editing and storing values of your curcfg.xml. This is a prerequisite, getting to the prompt and running stuff on the prompt is a must-have.

    Introducing curcfg_tool: Utility to make changes to your configuration

    $
    0
    0

    As I have promised a number of times to number of people. Here it finally is! The first version of my tool to alter your B593 configuration. With this tool you can change admin passwords for web GUI and SSH to something of your liking. It does not (yet) convert plaintext passwords into encrypted ones, but it successfully writes the changes to flash, thus making them permanent.

    Prerequisites

    • Huawei B593 u-12
    • Access to your box for running commands, telnet/SSH are really good options for this
    • While at Busybox sh prompt, internet connectivity via the mobile interface (4G/3G/2G)

    Getting the tool

    The MIPS32 binary version suitable for running at your B593 is at http://opensource.hqcodeshop.com/Huawei%20B593/curcfg/latest. The C source code is also available at: http://opensource.hqcodeshop.com/Huawei%20B593/curcfg/

    1. Log into your box
    2. (recommended) Change into directory /upgflash/
    3. Download the binary into your box:
      wget -g -v -l curcfg_tool -r "/Huawei%20B593/curcfg/latest" opensource.hqcodeshop.com
    • As you can see, Busybox has a mighty quirky wget!
    • Anyway, that command will download the tool from the above URL and place it to the current directory with local name curcfg_tool.
    • Also note, that your box must have a functioning Internet access for download. The only other viable option is via FTP-hack. The environment is very limited and file transfers are restricted heavily.
  • Make sure, that the file is executable:
    chmod a+x curcfg_tool
  • Running the tool

    Now that you have the thing sitting there, run it:

    # ./curcfg_tool
    Usage:
    -V                     - Print version information
    -cw <base64 encoded web gui password>  - set password
    -cs <base64 encoded SSH password>      - set password
    -w                     - write changes to flash (default: don't write)
    -fi <file name>        - input file (default: read from flash)
    -fo <file name>        - write changes (default: /tmp/flashinfo.bin)

    An example of resetting the web-GUI password would be:

    # ./curcfg_tool -cw f5338SA1kb4= -w
    Read data: addr = 0xe00000, len = 0x4 ...
    Begin write to file
    Export done
    Reading 25785 bytes of config
    Read data: addr = 0xe00000, len = 0x64bd ...
    Begin write to file
    Export done
    Writing 25785 bytes of config
    /tmp/flashinfo.bin size = 25790 Bytes
    Read file done
    Begin write to flash
    Load file done

    The magicical Base64 encoded 3-DES encrypted string f5338SA1kb4= is "admin" in plain text. After a reboot (just say reboot at prompt), you can login into your web-GUI and change the password into something of your liking.

    What next?

    That's pretty much it as of now. If you don't like your operator designated passwords, you can change them.

    How do I ...

    • ... see what my current password is:
      You cannot. Encryption key is not known for pre-SP100 firmware and SP100+ firmware is using double encryption with 3-DES and AES and entire flow of information is not yet known.
    • ... access the prompt of my box:
      See B593_exploit.pl for details.
    • ... access the prompt of my box, but I have SP100+ firmware and don't know any of my passwords:
      You cannot. Yet. Currently known exploits have been fixed preventing access.
      However, in this case the real question seems to be: "How did you get your box running in the first place?"
    • ... run the B593_exploit.pl -tool, my Perl isn't working:
      You may want to install all CPAN-modules the script requires. Also skip the Windows and use a proper computer.

    iOS 8 upgrade on iPhone 4S

    $
    0
    0

    Being an old geezer, I typically upgrade my iPhone firmware via USB-cable. Wireless users need to wait for the upgrade to happen, USB-people simply plug the cable and go. Also it is a very robust method and less things will go wrong than doing it wireless. Yeah, right!

    So I plugged my phone in. Made sure, that I had latest iTunes version running and that a recent backup was made. Then, DÄNG!

    Yeah. Crap! The iPhone could not be updated. An unknown error occurred. Really? Is it possible to be more vague? Next to frustration, the next thought that goes through my mind is: "Did I brick it!!! Is it still salvageable?".

    Quite soon I had a positive signal:

    Phew! iTunes announced, that the device is in recovery mode. Somewhere before it actually started the process, there was a question "Do you want to upgrade software and restore backup?" In reality it was a non-question, pretty much the only choice was "Ok". Looks like I didn't manage to get a screenshot of that.

    The actual recovery process took a very long time. At the time I didn't realize, that it wasn't a "recovery" by definition. It was a simple iOS install. The next iTunes said was:

    I'm not sure if this is part of the iOS 8 kill-switch -procedure or is that a regular thing to gain Internet access via 3G, but the installation refused to continue before I had successfully entered the PIN-code for my SIM-card. Then iTunes was ready to start restoring my precious data to the device:

    At Apple there is a known reality distortion field, making a nice guestimate of 3 minutes for the restore time. After 15 minutes, the best guestimate was less than 1 minute. Nevertheless, I really had nothing else to but to wait for the restore to complete. Finally it said:

    Oh yes!! I didn't brick it after all. I simply took the long route to the end.

    It really wasn't worth the update. The only really noticeable thing is the voice button in messaging and the fact, that it drains my battery much faster than my previous iOS 7 did. But who would have guessed that would happen, or ... iOS 7.1 makes everything faster — including your battery drain @ 9to5mac.com. So, does that really happen every time they release an upgraded iOS-version? :-)

    Viewing all 142 articles
    Browse latest View live


    Latest Images

    <script src="https://jsc.adskeeper.com/r/s/rssing.com.1596347.js" async> </script>